If there is one thing that is of utmost importance to your website, apart from SEO, it is undoubtedly security. HTTP security headers provide an additional layer of security against common vulnerabilities. Through a series of articles, we are aiming to show you how you can implement HTTP security headers for your WordPress website. In this article, we will take a look at the headers themselves and how you can implement them in WordPress through a plugin.
- HTTP Security Headers
- X-Frame-Options
- Implementing the X-Frame-Options Header on WordPress
- X-XSS-Protection
- Implementing the X-XSS-Protection Header on WordPress
- X-Content-Type-Options
- Implementing the X-Content-Type-Options Header on WordPress
- Content-Security-Policy
- Implementing the Content-Security-Policy Header on WordPress
- HTTP Strict Transport Security
- Implementing the Strict-Transport-Security Header on WordPress
- Referrer-Policy
- Implementing the Referrer-Policy Header on WordPress
- Conclusion
HTTP Security Headers
X-Frame-Options
This security header protects the website from clickjacking attacks. It generally uses the HTML iframe or frame elements to load your website onto another site. With this header in place, you can control whether or not this should be allowed. It can have three different values, DENY, SAMEORIGIN, and ALLOW-FROM uri. The meanings of these are self-explanatory with DENY blocking any domain from loading the content from your website inside a frame (or iframe). SAMEORIGIN allows your website only to load content while ALLOW-FROM uri allows particular websites.
Implementing the X-Frame-Options Header on WordPress
Method 1 – Via the wp-config.php file
Find the wp-config.php file for your WordPress installation and edit it. You need to add the following line to add the header. The value of ‘SAMEORIGIN’ can be replaced with DENY or ALLOW-FROM uri.
header(‘X-Frame-Options: SAMEORIGIN’);
Method 2 – Via the .htaccess file
Similar to the first method, find the .htaccess file in your WordPress installation. You need to add the following line to add the header.
<ifModule mod_headers.c>
Header set X-Frame-Options SAMEORIGIN
</ifModule>
Method 3 – Via the Redirection plugin
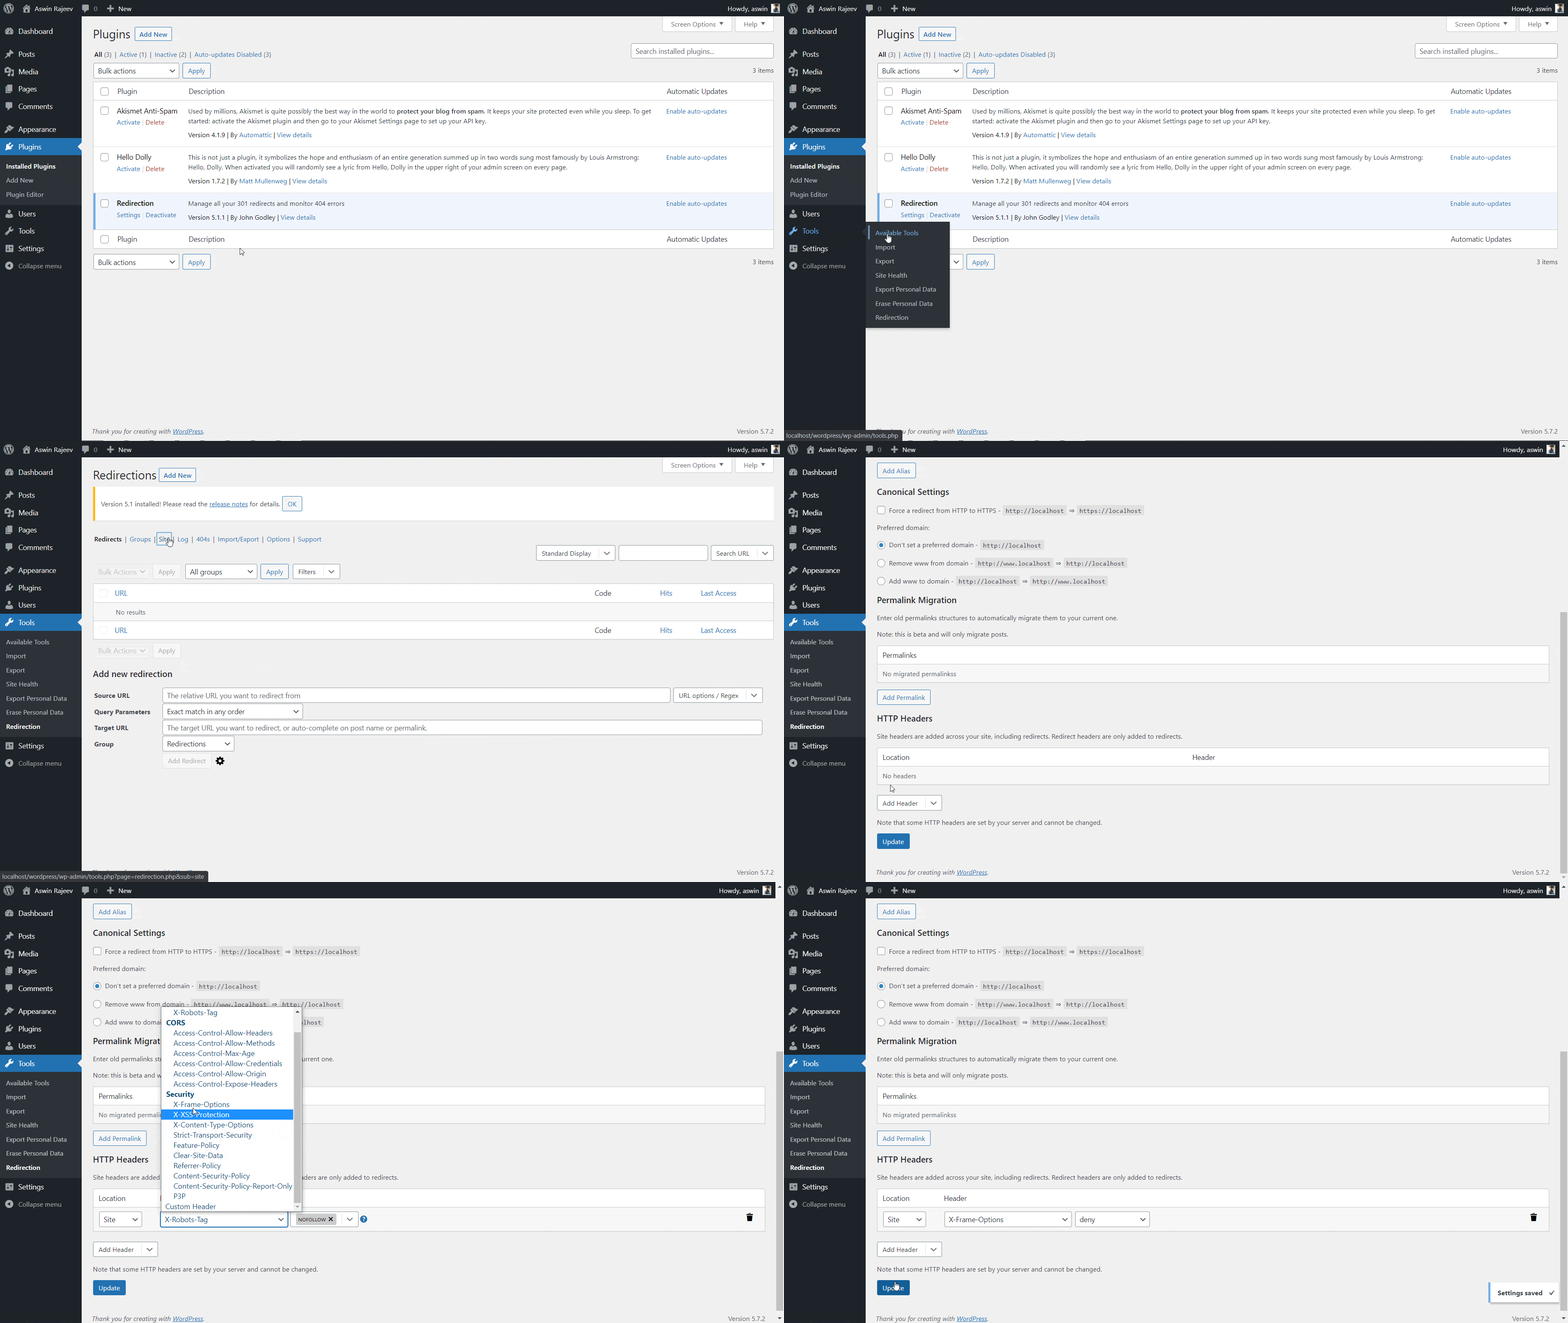
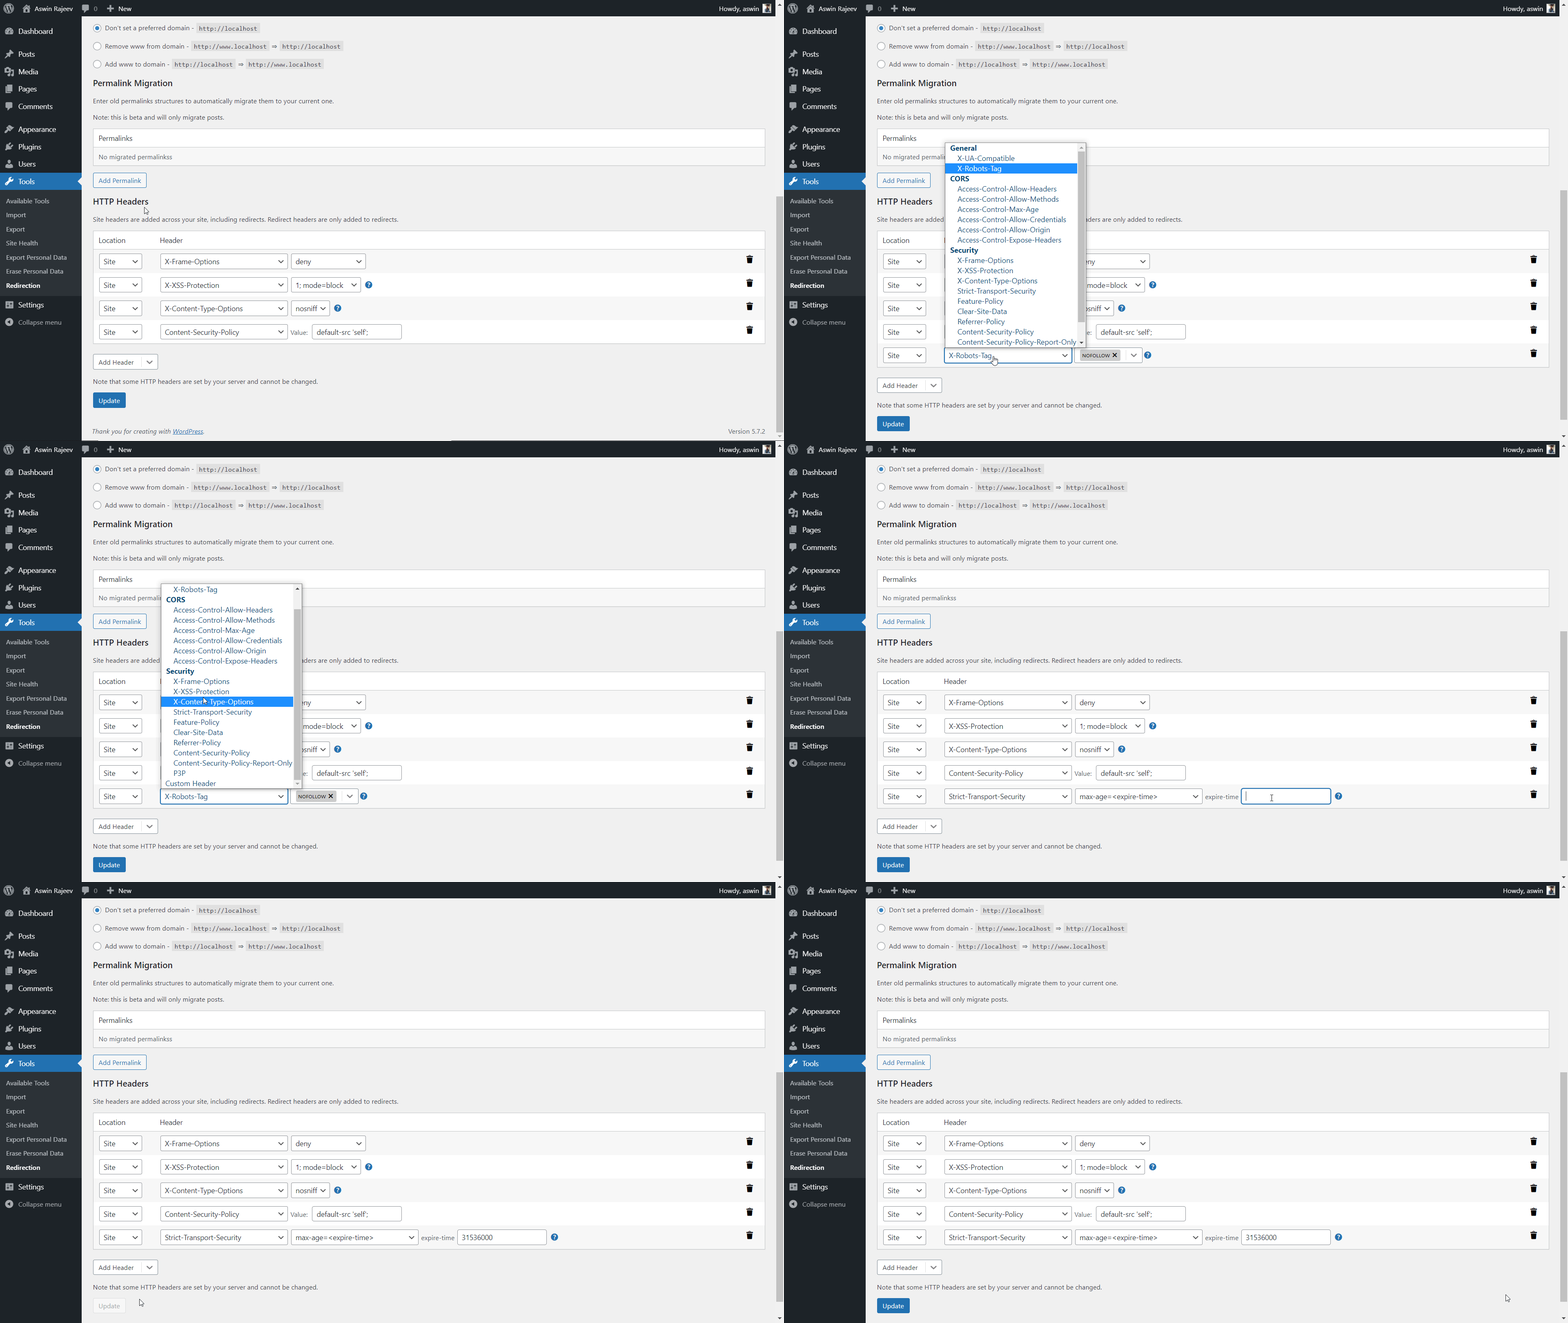
Install the Redirection plugin from within your WordPress admin panel. Activate it and you should see it under the tools menu. Clicking on it will take you to another page where you have to open the site tab. Scroll down to find the HTTP headers option and do as shown below.
X-XSS-Protection
XSS attacks or cross-site scripting attacks are done by injecting scripts onto the client-side web page. This allows them to compromise the user’s interactions on the page. This header is not really necessary in modern browsers but including it is good if your users are still using a legacy version of the popular browsers.
Implementing the X-XSS-Protection Header on WordPress
Method 1 – Via the .htaccess file
Similar to the first method, find the .htaccess file in your WordPress installation. You need to add the following line to add the header. The value 1 enables XSS filtering and the mode block prevents the site from loading during an attack.
<ifModule mod_headers.c>
Header set X-XSS-Protection “1; mode=block”
</ifModule>
Method 2 – Via the Redirection plugin
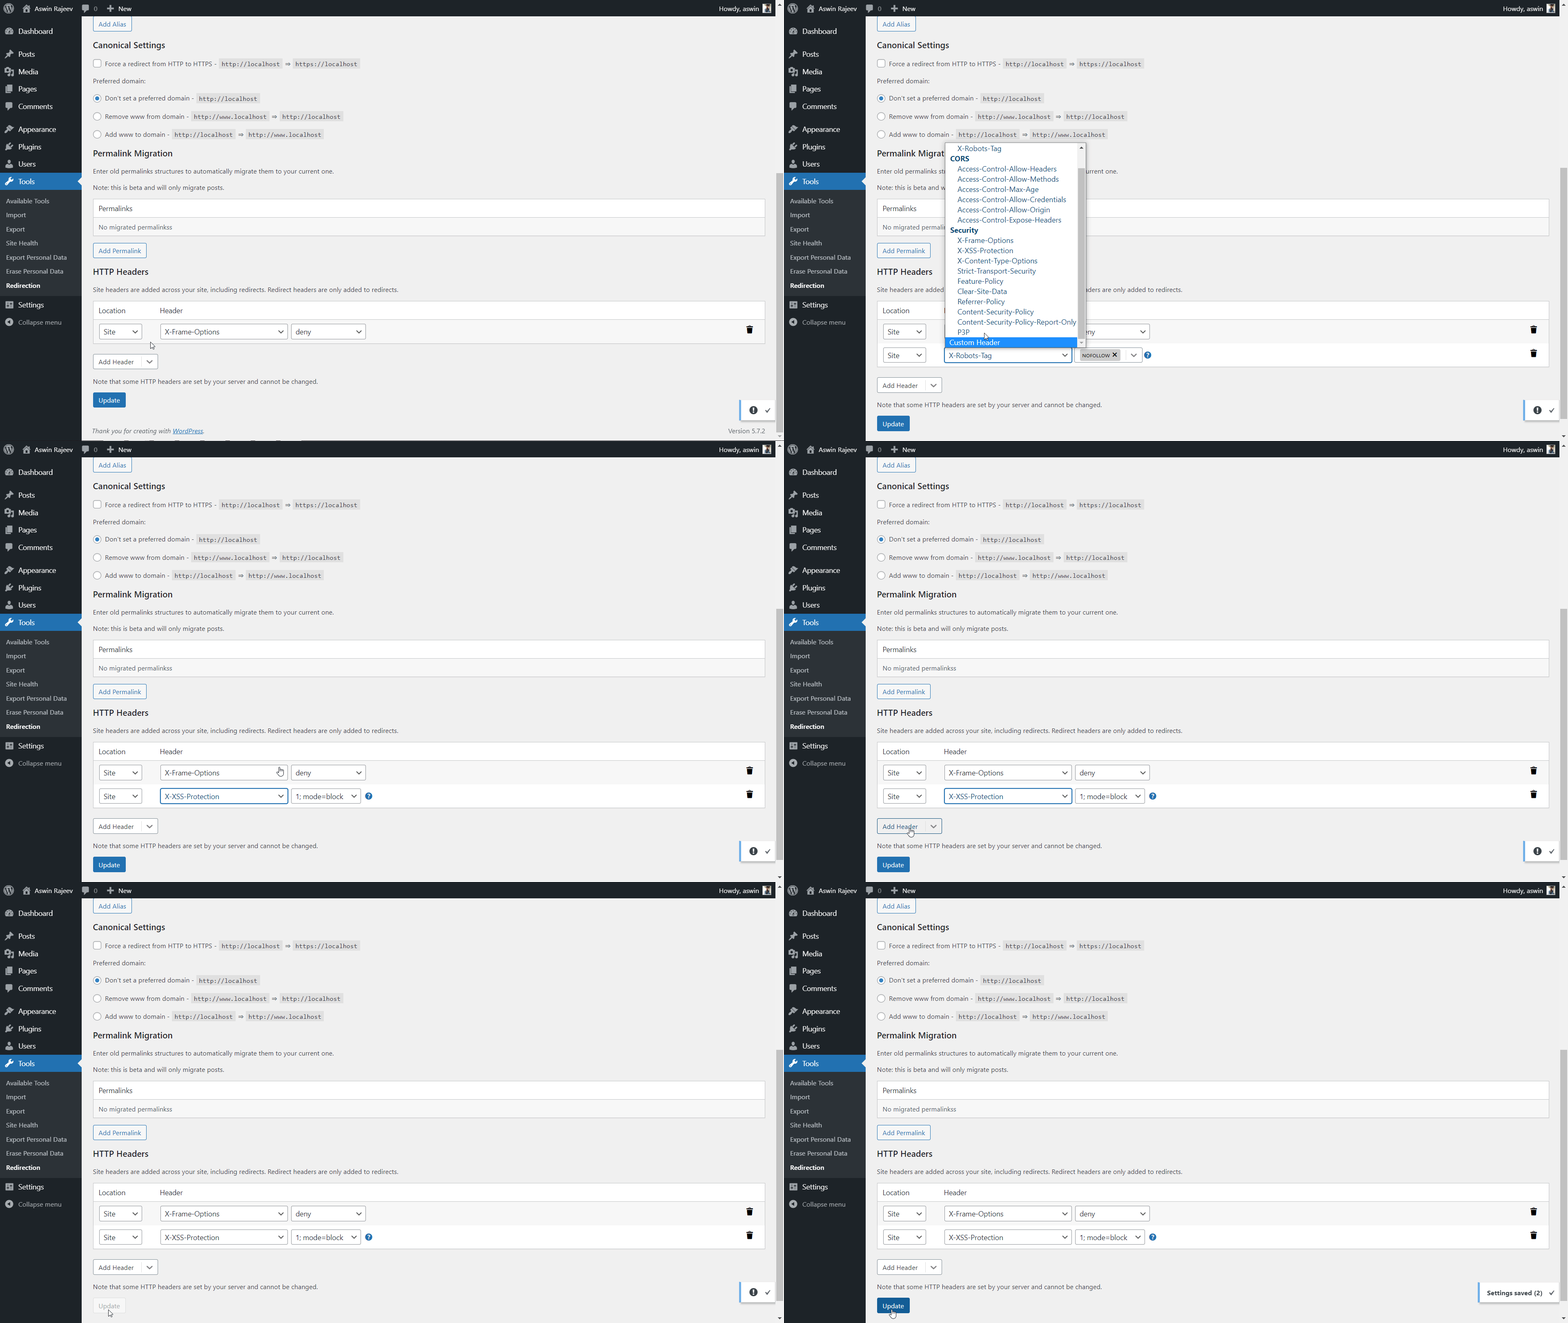
Same as before, scroll down to the HTTP headers section and add the X-XSS Protection header from the dropdown. Click on update to save the settings.
X-Content-Type-Options
This header prevents MIME type sniffing which is basically a way of sniffing content on websites by analyzing the byte stream and trying to deduce the format of the content. This attack is prevented by mentioning the MIME type in the Content-Type header which should be adhered to strictly.
Implementing the X-Content-Type-Options Header on WordPress
Method 1 – Via the .htaccess file
Edit the .htaccess file and add the following line.
<ifModule mod_headers.c>
Header set X-Content-Type-Options nosniff
</ifModule>
Method 2 – Via the Redirection plugin
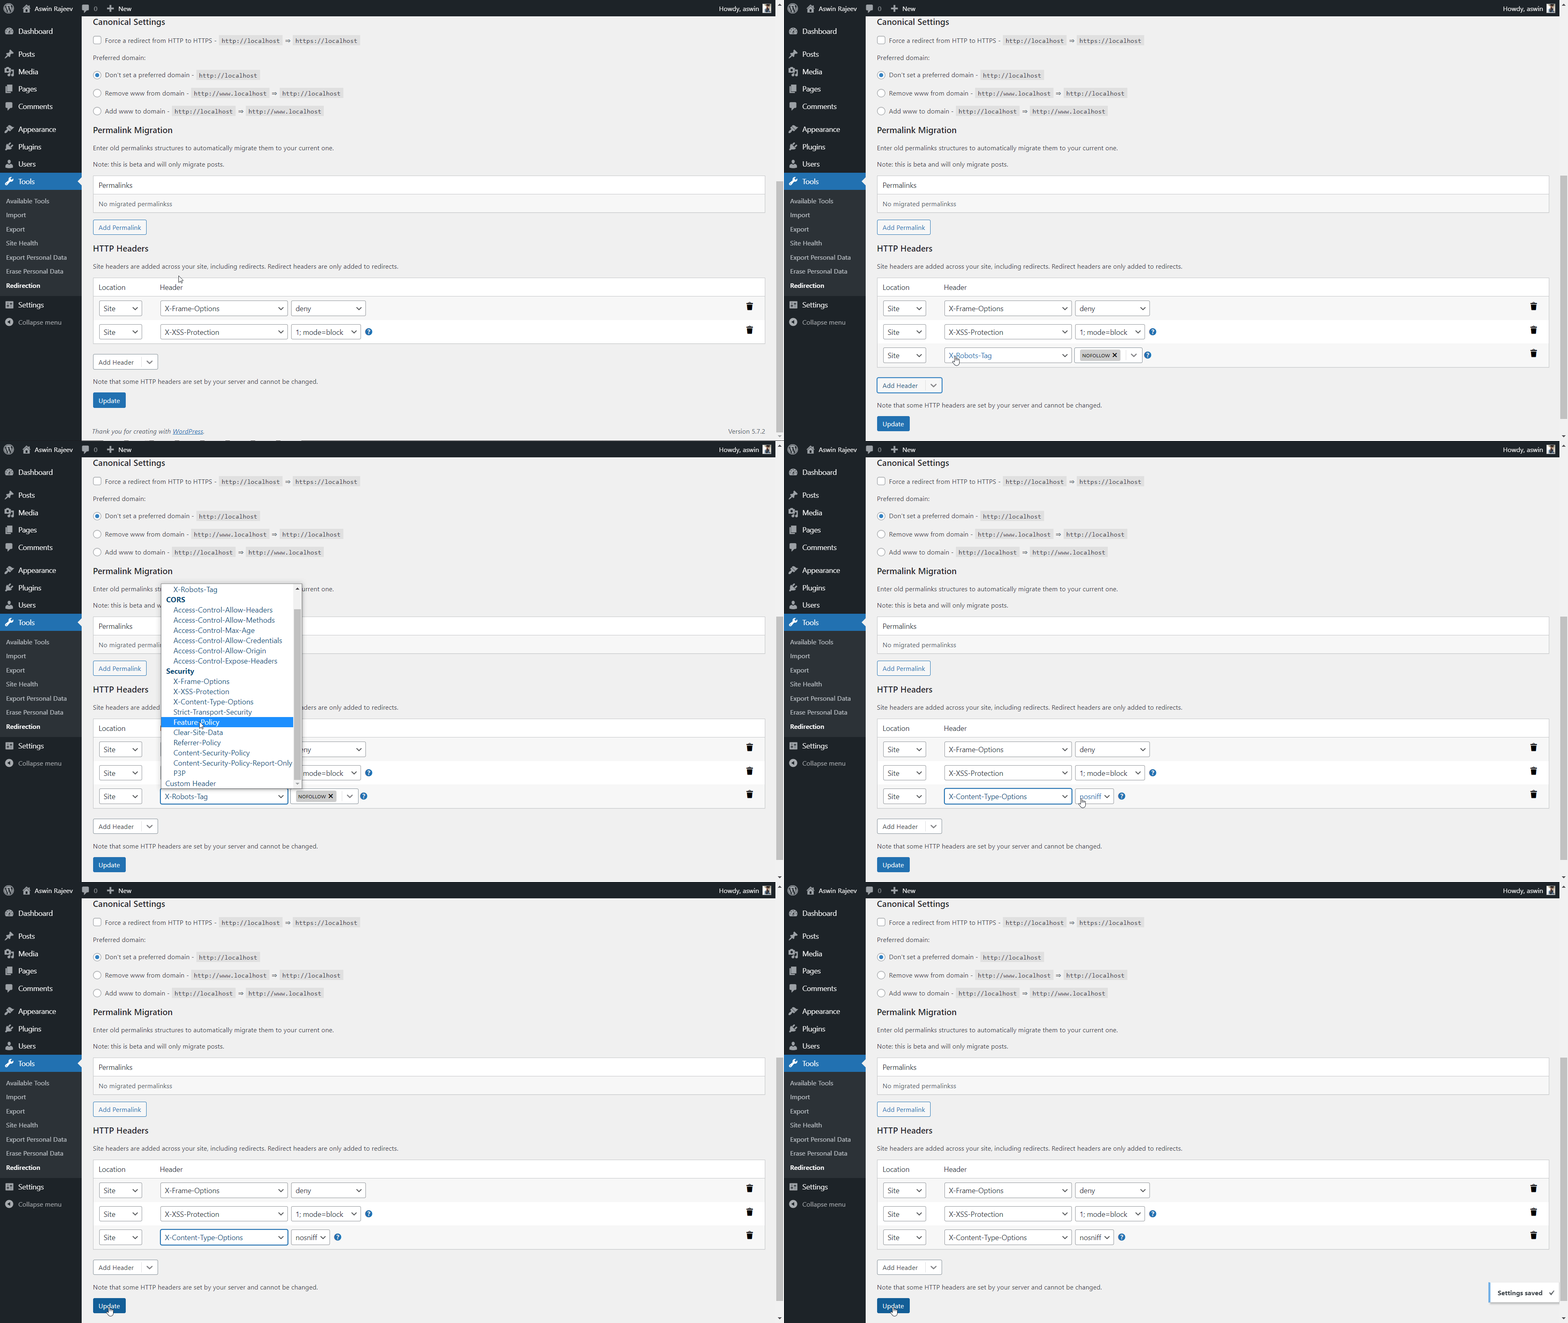
Scroll down to the HTTP Headers section and add the X-Content-Type-Options header. The default value of nosniff is what we want to prevent MIME sniffing vulnerabilities. Update to save the settings.
Content-Security-Policy
This is one of the most important headers as of today because it helps in preventing cross-site scripting attacks and other data injection attacks. Cross-site scripting accounts for almost 84% of security vulnerabilities on web pages. The irony is that most of these websites don’t have this header in place.
Implementing the Content-Security-Policy Header on WordPress
Method 1 – Via the .htaccess file
Edit the .htaccess file and add the following line.
<ifModule mod_headers.c>
Header add Content-Security-Policy “default-src ‘self’;”
</ifModule>
Method 2 – Via the Redirection plugin
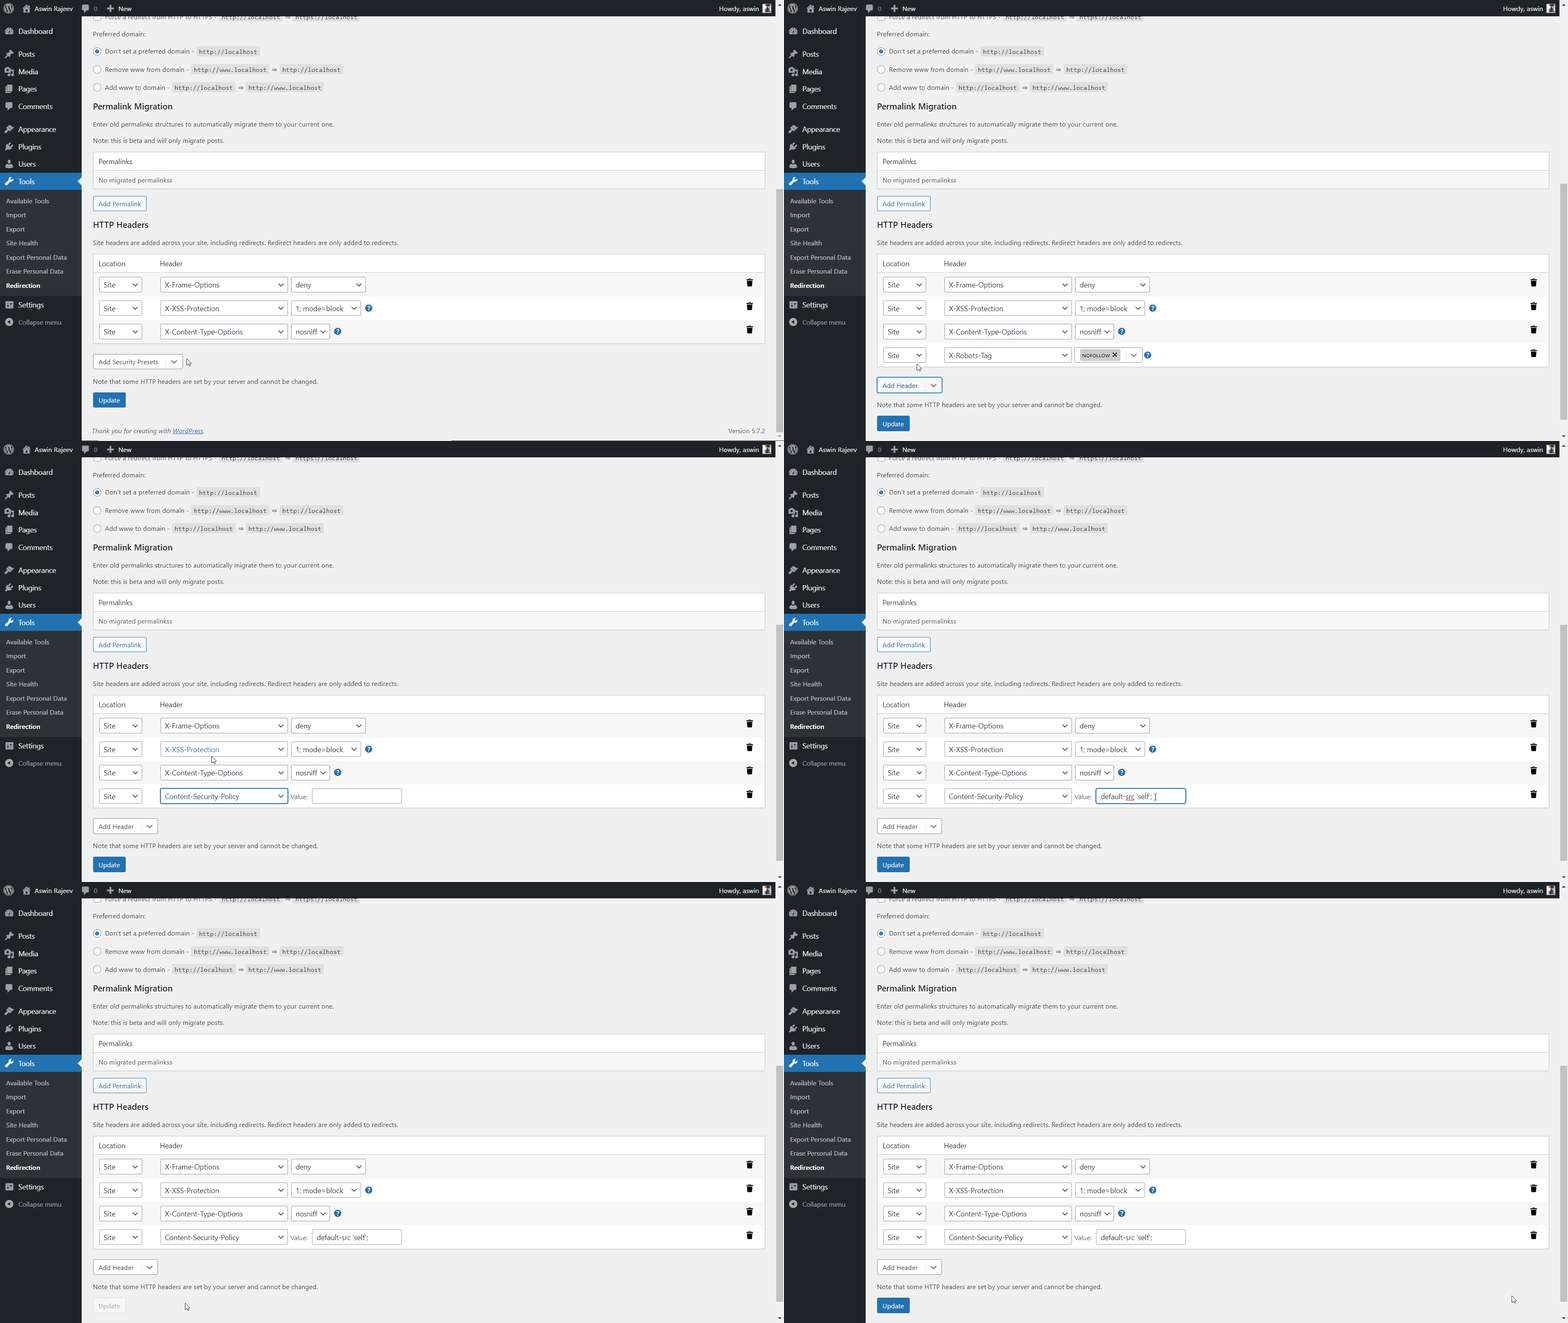
Select the Content-Security-Policy header from the dropdown and set the value to default-src ‘self’; and hit update to save the settings.
HTTP Strict Transport Security
With the HTTP Strict Transport Security (HSTS) header, browsers will not load your website through insecure protocols like HTTP. A lot of websites are transitioning from HTTP to HTTPS. This header must be present if you’ve recently done this.
Implementing the Strict-Transport-Security Header on WordPress
Method 1 – Via the .htaccess file
Edit the .htaccess file and add the following line. Max age specifies the expiry time and this is the equivalent of 1 year.
<ifModule mod_headers.c>
Header set Strict-Transport-Security “max-age=31536000” env=HTTPS
</ifModule>
Method 2 – Via the Redirection plugin
Scroll down to the HTTP Headers section and add the Strict-Transport-Security header. Set the expiry time and click on Update to save the settings.
Referrer-Policy
The Referrer header holds the information in an HTTP request and this can sometimes have certain private information. This header denotes how much of the referrer information should be present within the requests.
Implementing the Referrer-Policy Header on WordPress
Method 1 – Via the .htaccess file
Edit the .htaccess file and add the following line. No referrer when downgrade specifies not to send the referrer information if the protocol level goes below the current protocol level.
<ifModule mod_headers.c>
Header Referrer-Policy: no-referrer-when-downgrade
</ifModule>
Method 2 – Via the Redirection plugin
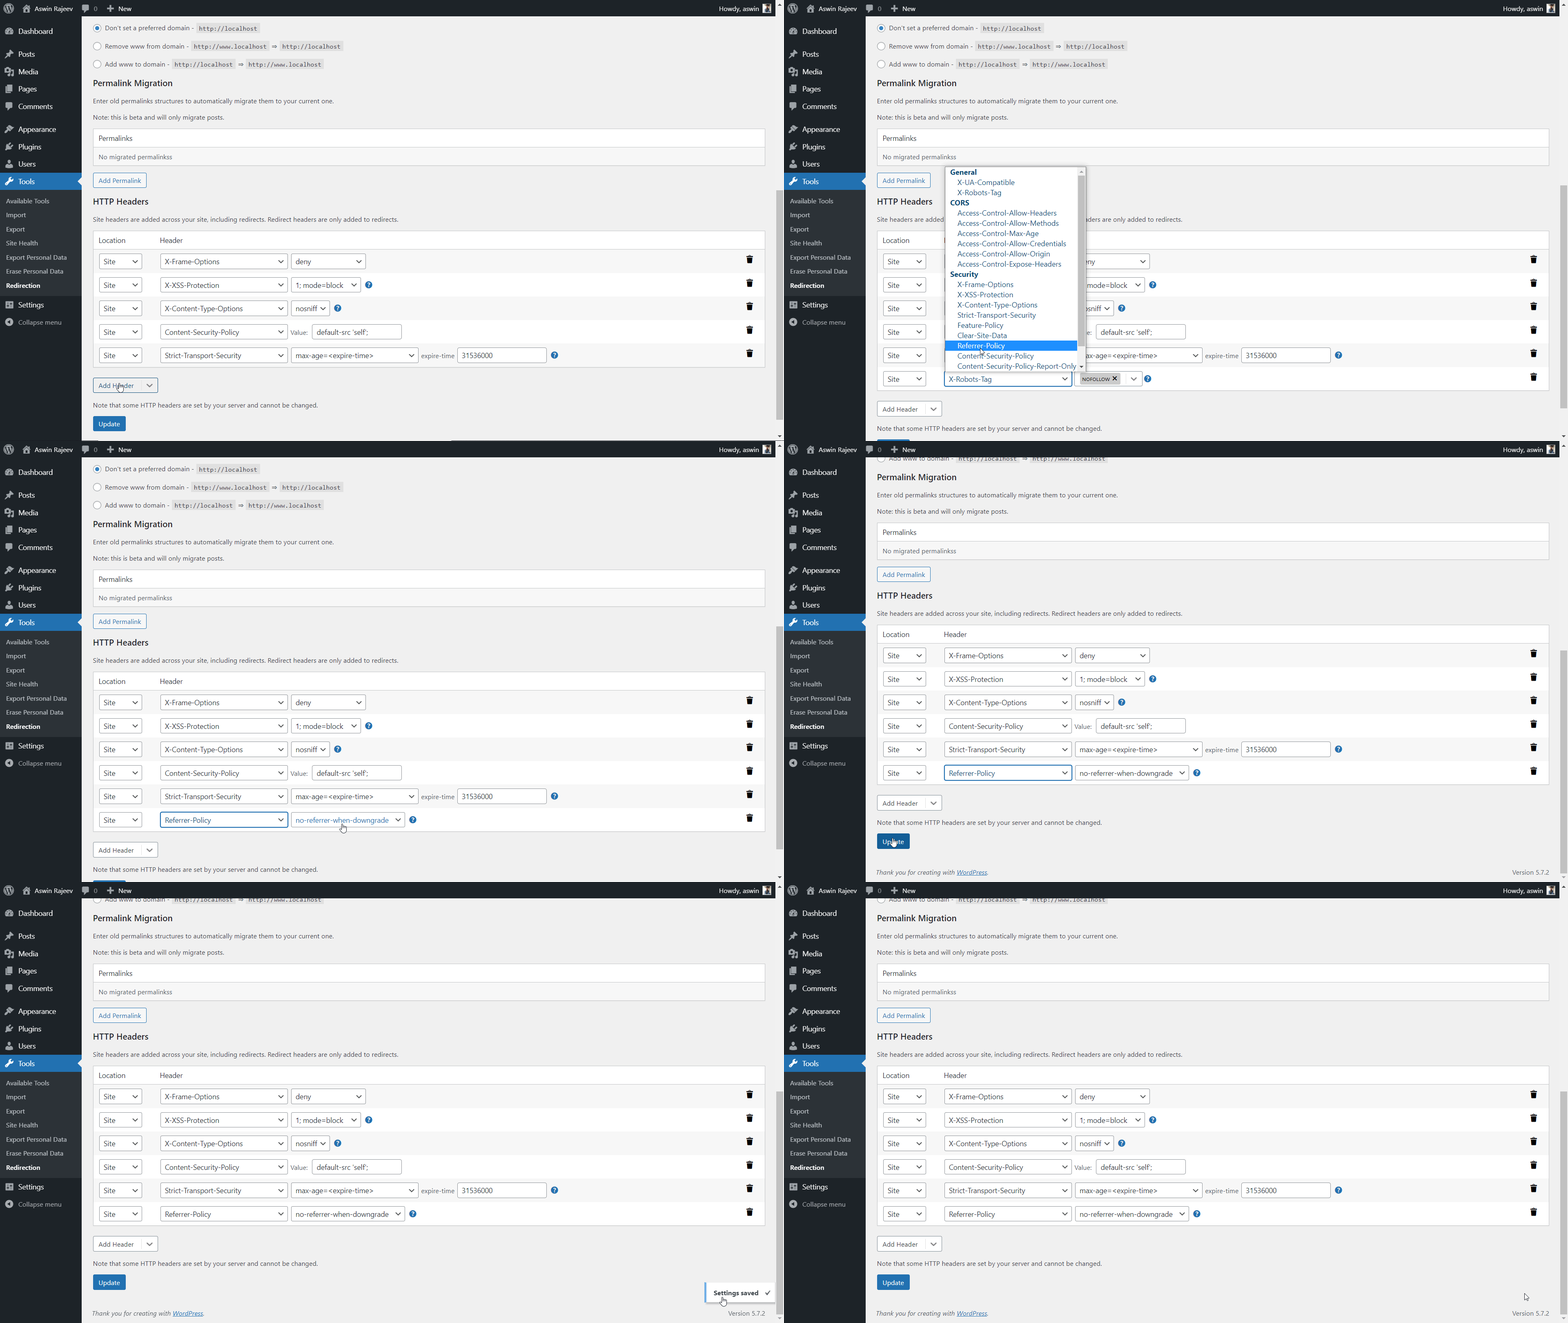
Scroll down to the HTTP Headers section and add the referrer-policy header. The default value is commonly used. Hit update to save the settings.
Conclusion
With that, you should have a WordPress website that is secure from common vulnerabilities. Do note that setting HTTP security headers is one of the many ways in which you can protect your website. Keep a watch out for threat reports to know how attackers are trying to compromise your information. The more you know about these vulnerabilities the better you will be able to safeguard your website from them.

Marketing Specialist | Content Writer
Experienced in SaaS content writing, helps customers to automate time-consuming tasks and solve complex scraping cases with step-by-step tutorials and in depth-articles.
Follow me on Linkedin for more SaaS content
